Article written by Nahush Gowda under the guidance of Satyabrata Mishra, former ML and Data Engineer and instructor at Interview Kickstart. Reviewed by Swaminathan Iyer, a product strategist with a decade of experience in building strategies, frameworks, and technology-driven roadmaps.
AI is reshaping how work gets done. Knowing how to build smart, self-running workflows isn’t just a nice skill; it’s starting to feel essential. But here’s the catch: for most people, the second coding enters the equation, everything grinds to a halt.
That’s where n8n changes the game. It’s an open-source tool that doesn’t require any coding. You just drag and drop blocks to create smart workflows. Whether you’re working with OpenAI, Pinecone, or just using plain HTTP requests, n8n makes it easy for anyone to build custom AI agents from scratch.
This guide walks you through how to build one of those agents using n8n’s visual tool. You’ll learn how to set up flows that can think things through, remember what happened earlier, and actually do something based on that info. Whether you want to reply to emails automatically, support customers, or do some behind-the-scenes research, this walkthrough will help you build AI agents with n8n without getting bogged down in the technical side of things.
No messy code. No tech headaches. Just simple, useful automation that works.
Understanding Agentic Workflows
Before jumping into how n8n helps you automate your work using AI, it’s worth getting clear on what an “agentic workflow” actually means and how it goes way beyond old-school automation.
What Is an Agentic Workflow?
Instead of just running tasks based on simple rules, agentic workflows work more like people. They take in information, think about it, remember what’s happened before, make a decision, and then do something. That’s a big step up from your usual “if this happens, do that” kind of setup.
Here’s the difference: a regular automation might move data from one place to another, for example, copying a row from Google Sheets to Airtable. But an agentic system can read a support ticket, understand the tone, check the customer’s past issues, figure out the right response, and write an email, all without needing human intervention.
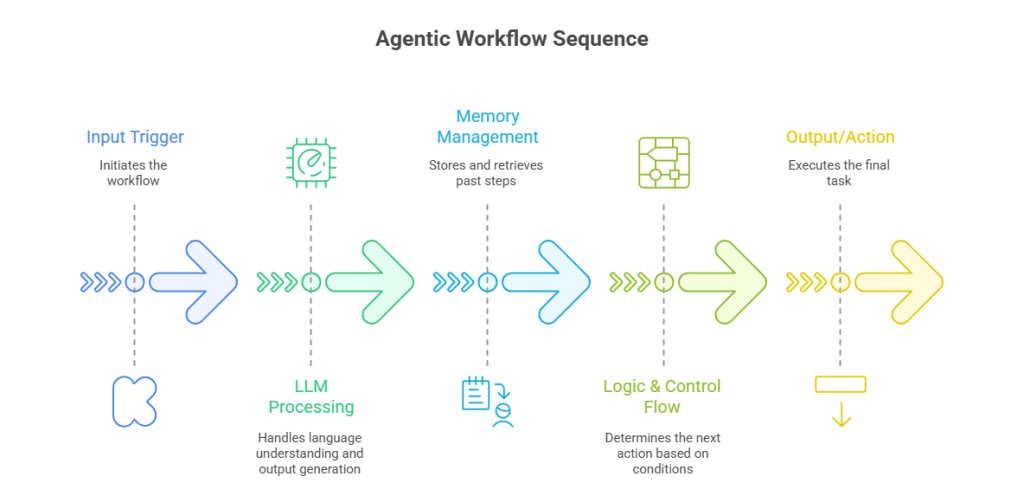
What Makes Up an Agentic Workflow?
- Input Trigger: This is what kicks things off. Could be a webhook, a form submission, or a scheduled event.
- LLM (Large Language Model): Usually something like OpenAI. It handles thinking, language understanding, and output generation.
- Memory: Keeps track of earlier steps or past messages. That way, the agent remembers what’s been done before and doesn’t repeat itself.
- Logic & Control Flow: These parts decide what to do next. Think switches, filters, or condition blocks.
- Output/Action: The final task, like sending an email, posting to a team chat, or updating a spreadsheet.
Real Use Cases
- Email Assistants: Understand the message, craft a smart reply.
- Lead Research: Pull company data, boil it down into a quick summary.
- Customer Support: Read messages, check history, and answer based on what it knows.
- Internal Help: Fill out reports, manage schedules, or update records.
With n8n, you don’t need to piece all this together with code. You just build it visually, connecting blocks like puzzle pieces. Focus on what you want it to do, and n8n takes care of how it gets done.
Ready to see how to build AI agents in practice? Let’s look at why n8n is the best tool for the job.
Why Choose n8n for No-Code Agentic Workflows
If you want to build AI agents but don’t want to mess with code, n8n is one of the most practical tools out there right now. It’s open-source, easy to customize, and full of features designed for serious automation that helps you get work done.
Unlike tools like Zapier or Make, which can feel a bit boxed in, n8n gives you room to build exactly what you need. You control the data, the logic, and which services you connect, and you don’t need to be a developer to do it. You can integrate tools like OpenAI or Pinecone, set your conditions, and even create loops or memory inside your workflows.
What Sets It Apart?
It has open-source options that let you run it on your own server if you care about privacy or need something more tailored. Or just use n8n Cloud if you want it hosted. You can have a lot of integrations with over 400 nodes available. You can use it for everything from databases and APIs to Notion, Gmail, Slack, and OpenAI.
With built-in AI, you can connect to models like GPT-4 right in your flow. No extra setup, no plugins are required. You can build out complex flows visually with drag-and-drop logic. You can also add conditions, loops, and memory blocks to make your AI agent smart and responsive.
| Feature | n8n | Zapier | LangChain (Code) |
| No-code Agent Building | Yes | No | No (code required) |
| AI (OpenAI) Integration | Built-in | Limited | Yes (via Python) |
| Memory / State Support | Possible (via DBs) | No | Yes |
| Self-hosting Option | Yes | No | Yes |
n8n hits a sweet balance where it is powerful enough for advanced setups but simple enough that you don’t need to learn a new language or deploy servers just to get going.
Next up, we will look at what you need before building your first AI agent with n8n.
Also Read: How Beginners Can Learn AI: A 12-Month Roadmap
Pre-Requisites: What You Need to Get Started
Before you roll up your sleeves and build an AI agent in n8n, you’ll want to have a few essentials set up. You don’t need a tech background or a fancy degree — just the right tools and a bit of curiosity.
1. Your n8n Setup: Pick One
- n8n Cloud: Easiest option. Just go to n8n.io, sign up, and you’re good to go.
- Self-Hosted: If you want more control, you can run n8n locally using Docker, on a virtual server, or any setup you prefer. Great for folks who want more say in how things run or where data lives.
2. OpenAI API Access
- If your agent needs to think, write, or analyze, you’ll need OpenAI’s API. Either GPT-3.5 or GPT-4 will work.
- Head to platform.openai.com and sign up.
- Once you’re in, grab your API key. This connects OpenAI to your n8n workflows. You’ll use it inside the OpenAI node.
3. Optional: Add Memory
- Want your AI agent to remember things? Like past conversations, facts, or customer details? You’ll need some kind of memory.
- Use a vector database like Pinecone, Chroma, or Weaviate.
- Or stick with basics like n8n’s built-in Postgres or even Redis if you’re familiar with it.
4. Other Apps You Might Want to Connect
What your agent does will guide what else you need. For example:
- Email (Gmail, Outlook) for reading and sending messages.
- CRMs (like HubSpot or Salesforce) to update contacts or deals.
- Forms or Webhooks for collecting data.
- Messaging tools (Slack, Discord) for back-and-forth communication.
5. Get Comfortable with the Basics
No need to code, but it helps to know your way around n8n:
- Add and connect nodes (just drag and link).
- Use expressions like {{$json[“message”]}} to reference incoming data.
Once you’ve got all this in place, you’re set to start building. Next, we’ll walk through how to create a working AI agent in n8n, one step at a time.
Step-by-Step Guide to Creating Agentic Workflows in n8n
Let’s see how to create a fully working AI chat agent in n8n with no programming required. By the end, your chatbot will:
- Hold a live conversation
- Use an AI model (like GPT-4)
- Remember previous messages (basic memory)
- Be fully customizable
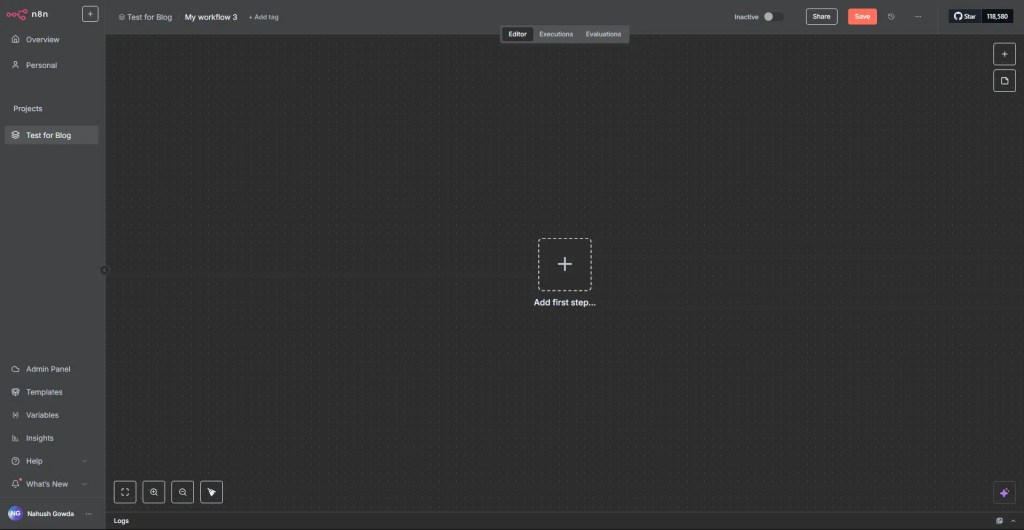
Step 1: Create a New Workflow
When you start building in n8n, you begin with an empty “canvas”, which is a blank space where everything happens. You’ll add and link different blocks, called nodes, to map out your workflow from start to finish.
Each node does something specific. One might grab data from Gmail, another might pass it to OpenAI to analyze or draft a response, and another might post that reply to Slack or save it in a database. You connect these nodes like a chain, one step leading to the next, shaping how your AI agent thinks and acts.
How to do it:
- Log in to n8n Cloud.
- On your dashboard, click “New Workflow” (top right).
- You’ll now see a blank editor canvas.
Step 2: Add a Chat Trigger Node
The Chat Trigger node in n8n acts like a live chat window. It’s how your workflow listens and responds in real time. Think of it as the spot where a user types their message, and your AI agent picks it up and runs with it.
Here’s how to set it up:
- On your canvas, click “Add first step” (the plus sign) or just hit the Tab key on your keyboard.
- In the search bar that pops up, type Chat Trigger.
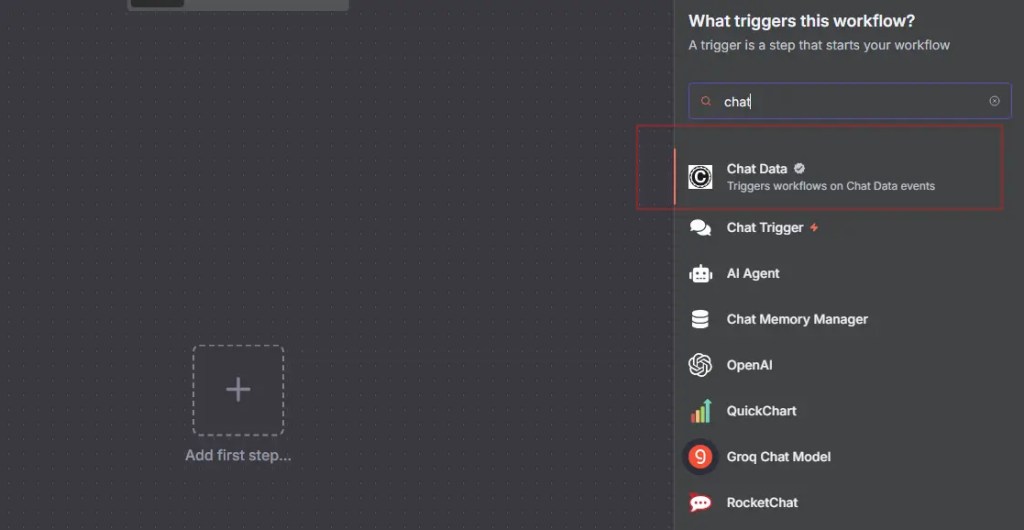
- Click the Chat Trigger node to drop it onto the canvas.
- You’ll land in the node’s settings panel, but for now, you don’t need to adjust anything. Just hit “Back to canvas” to return.

Note: The Trigger node works by listening for an event to occur and then sets the rest of your workflow in motion. In this case, that event is someone typing a message. For now, you’re just using n8n’s built-in local chat interface, which makes things easy. No need to connect it to a website or set up anything fancy. You can type directly into the interface, and the workflow will respond right away. Later on, when you’re ready to use this in a real setting, you can connect the trigger to a public-facing chat box, either the one n8n provides or the one you’ve embedded into your own website.
Step 3: Add an AI Agent Node
This is the step where your chatbot actually gets smart. The AI Agent node is what gives it a brain. It takes what the user types and sends it to an AI model (like GPT-4) to come up with a meaningful reply.
Here’s how you do it:
- Find your Chat Trigger node on the canvas.
- Hover over it and click the small “+” circle at the bottom.
- In the search bar, type AI Agent, then click to add it.
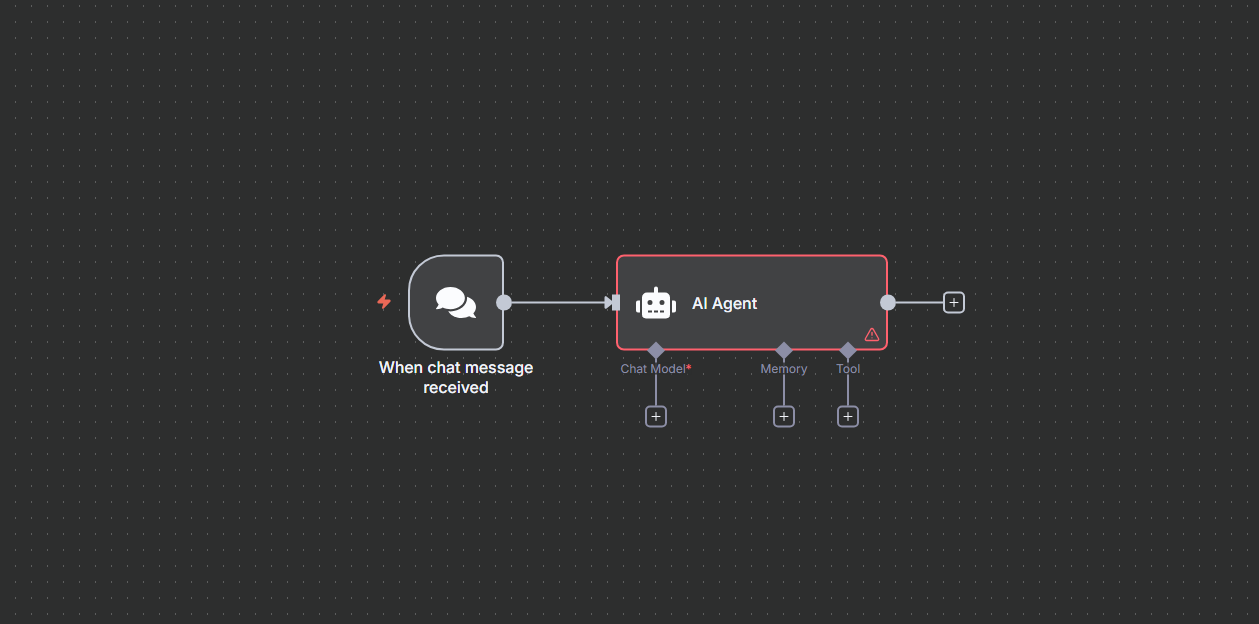
Once you do that, n8n automatically links it to the Chat Trigger. So now, you’ve set up a basic path:
“When someone sends a message → send that message to AI → get a response.”
You don’t have to worry about prompts or instructions yet; that part comes next. For now, just focus on connecting the pieces.
Step 4: Connect a Chat Model (OpenAI)
Right now, your AI Agent node is just an empty box. It won’t do much until you plug it into an actual AI model, the thing that does the thinking and writing. In this step, you’re connecting your agent to the brainpower it needs.
n8n supports a bunch of different models like OpenAI, Gemini, DeepSeek, Groq, and more. But for this walkthrough, we’ll stick with OpenAI. It is reliable, well-documented, and super effective.
Here’s how to hook it up:
1. Find the Chat Model Port
- Click on the AI Agent node.
- You’ll see several tiny connection points along the bottom.
- Look for the one labeled “Chat Model”, that’s where you’ll plug in the AI.
2. Add the Chat Model
- Click the small “+” button right below the Chat Model port.
- A search panel will appear, already filtered to show only chat models.
- Choose the OpenAI Chat Model from the list.
3. Configure the OpenAI Node
- Once added, the node settings will pop up automatically.
- From the Model dropdown, select either:
- gpt-4o-mini for a great mix of speed and quality.
- gpt-3.5-turbo for a solid performance, especially if you’re optimizing for cost.

No need to change the other settings for now. The defaults will work fine.
And that’s it! Your AI agent now has a real model to work with. It can take user messages, send them to GPT, and return a smart response. Next, you’ll learn how to fine-tune what the AI says using prompts.
Also read: DeepSeek vs OpenAI: Which is Better in 2025?
Getting Credentials to connect with
To let n8n talk to OpenAI or any outside service, you need to give it permission. That’s where credentials come in. For OpenAI, all you need is your API key. It’s basically a pass that says, “Yep, I’m allowed to use this AI model.”
Here’s how to connect it:
- Open the OpenAI Chat Model Node. If the settings window isn’t already open, just click the OpenAI node on your canvas.
- Find the Credentials field. Near the top, there’s a section labeled “Credentials.” If this is your first time using OpenAI in n8n, it’ll be blank.
- Add your API key. Click “Select Credential”, then pick “Create New.” A form pops up called “OpenAI API.”
- Now go to platform.openai.com/account/api-keys in a new browser tab.
- Copy your key (it starts with sk-).
- Come back to n8n and paste it into the field marked API Key.
- Click Save.
- Confirm if it’s working. Your new credential should now show up in the dropdown menu. Select it.
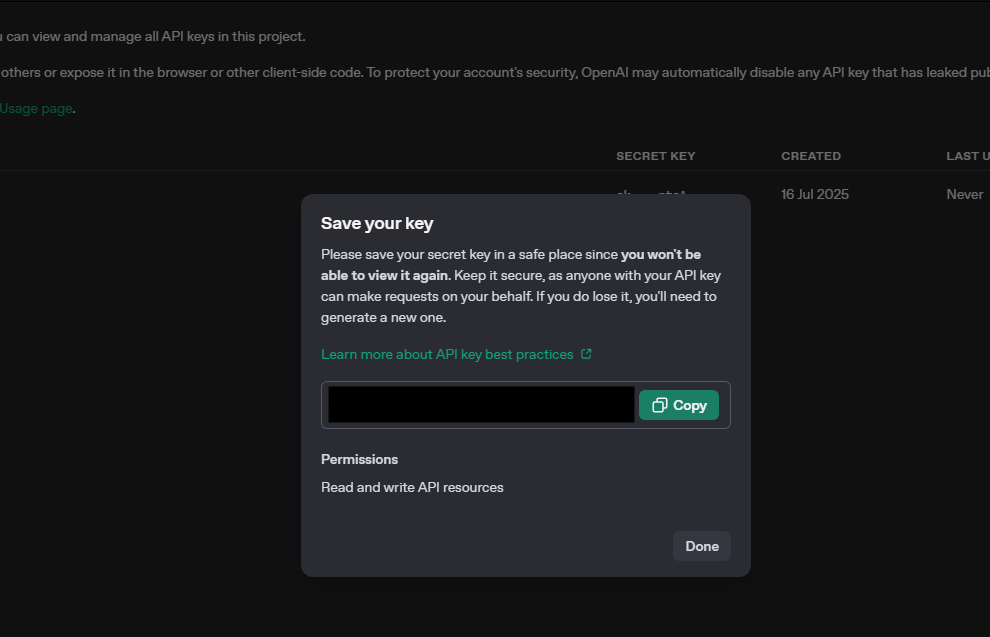
That’s It. You’ve now connected your agent to OpenAI securely and without writing a single line of code. Your chatbot can officially send user messages to GPT, get replies back, and keep the conversation going.
Step 5: Test the Chat Agent in Real Time
Your AI agent is all hooked up. Now it’s time to see it in action. You’ll test it out right inside n8n using the built-in chat panel. It’s like your own personal ChatGPT, but you control the workflow behind it.
Here’s how you can test your chatbot:
1. Open the Chat Window
- In your workflow editor, look toward the bottom of the screen.
- You’ll see a small Chat icon. Click it to open the local chat window.
2. Send Your First Message
- On the left side of the panel, you’ll find the text box.
- Try typing something like:
Hi! Can you help me reset my account password? - Hit Enter to send.
3. Watch It Work
- On the right side, n8n shows a log of what’s happening behind the scenes.
- You’ll see how your message flows through the nodes, especially the AI Agent node.
- A moment later, the chatbot should reply with something like:
Of course! To reset your password, please click the “Forgot password?” link on the login page. If you run into trouble, let me know.
4. Dig Into the Logs (Optional)
- Curious about how the AI crafted that answer? The log panel lets you check:
- The prompt that was sent to OpenAI
- The raw response it gave back
- Any errors or formatting changes along the way
This is super helpful when you start fine-tuning your prompts later. Your n8n chatbot is officially live and working. It accepts messages in real time, thinks through the question using GPT, replies in plain language, and shows every step of the process. And the best part? You haven’t touched a single line of code.
Step 6: Customize the AI Agent’s Personality and Role
Right now, your AI agent is playing it safe with the default prompt:
“You are a helpful assistant.”
That works fine for basic responses, but you’ve got way more control than that. Want the agent to sound warm and friendly? Or maybe act like a tech support rep? That all comes down to the system message with a small change that shapes the AI’s whole personality.
How to update the AI’s tone and behavior
- Open the AI Agent node. Click on the AI Agent block in your workflow.
- Go to the Options section. Scroll down to the bottom of the settings panel. Find the dropdown labeled “Add Option.” Click it, then select “System message.”
- Enter Your Custom Prompt. A new text box will appear labeled System message. This is where you rewrite the AI’s instructions. For example:
“You are a friendly and professional customer support assistant. Always greet the user by name, summarize their issue, and provide a clear solution.”
Save and Test It Out
- Click “Back to canvas” once you’ve set the message.
- Reopen the chat panel, send another message, and watch how the reply changes.
Just like that, you’ve trained your AI to act a certain way, not with code, but with plain language. The system message acts like a guiding voice in the AI’s head, shaping everything it says from that point forward.
Step 7: Add Memory for Chat Context
Right now, your AI agent is pretty sharp, but also a bit forgetful. Say “Hi, my name is Nick,” and then ask, “What’s my name?”, it’ll come up blank. That’s because the agent, by default, only sees the most recent message. It doesn’t remember past inputs unless you give it memory.
Here’s how to give your agent memory:
- Open the AI Agent Node. Click on the AI Agent node on your canvas to open its settings.
- Find the Memory Port. Look at the bottom of the node. There’s a connector labeled “Memory.”
- That’s where we’ll add memory support. Add a Memory Node. Click the small “+” button below that Memory port. A search window pops up; choose Simple Memory.

Note: This built-in memory option saves short-term conversation history using your n8n setup. No need for an external tool like Pinecone or Redis.
Adjust Settings (Optional)
You’ll see a field:
“Number of previous interactions to store.”
Leave it at the default – 5. That means your agent will remember the last five exchanges between you and the user.
Save and Test
Click Back to canvas, open the Chat window, and try a quick memory test.
Say: “My name is Nick.”
Then: “What’s my name?”
Your AI should now say: “Your name is Nick.” And just like that, your agent isn’t just smart, it’s got memory too.
Step 9: Save and Deploy Your AI Agent
You’ve pieced together a smart, responsive AI chat agent, but until you hit save, it’s just temporary. Saving locks in your workflow, so you can reuse it, upgrade it later, or plug it into real systems like your website, CRM, or app.
1. Click “Save”
- Look at the top-right corner of the n8n editor.
- Tap the Save button.
2. Name Your Workflow
- A small window will pop up asking you to name it.
- Give it something clear like: “AI Chat Agent v1”
- Hit Save again.
3. (Optional) Activate It
- If you want this agent to run outside of test mode, flip the Active toggle near the top of the canvas.
- This turns the workflow on, so it can be triggered by a webhook or embedded into another system.
4. Do One Last Test
- Open your Chat panel and send another message.
- Make sure it still responds the way you want.
Let’s Recap What You’ve Just Built
You now have a real, functioning AI chatbot inside n8n. It:
- Takes live chat input
- Uses OpenAI to craft thoughtful replies
- Tracks conversation context with memory
- Follows your instructions for tone and style
- Lives in a secure, fully visual workflow
All with zero coding.
Making the AI Agent more complex and powerful
You’re not locked in. n8n’s modular setup means you can expand your agent like adding new pieces to a Lego set:
- Connect it to your site with a custom frontend + webhook.
- Log every chat in Google Sheets, Notion, or your database.
- Add emotion detection to flag angry or frustrated users.
- Route tougher cases to a human agent or support team.
What you’ve built is the foundation. There are over 300 integrations that you can use to build a complex AI agent that can carry out a series of complex tasks.
Common Pitfalls When Building AI Agents in n8n
Even with n8n’s no-code magic, building AI agents isn’t completely foolproof. There are a few common traps that can trip you up, especially when you’re just getting started. Here’s what to watch out for, and how to sidestep the worst of it.
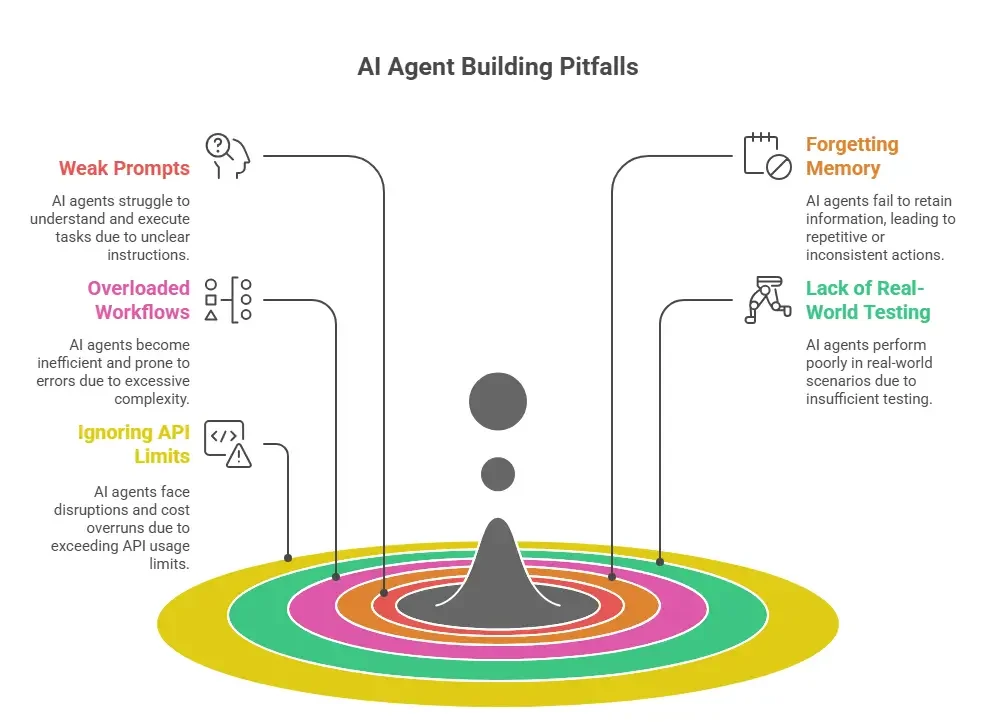
Weak or Vague Prompts
If you leave the system message too open-ended, the AI will give you weird, vague, or totally off-topic answers.
Be specific. Set the tone, role, and fallback behavior in plain terms. Instead of:
“You are a helpful assistant.”
Try this:
“You’re a polite customer support agent. Always greet users, answer clearly, and escalate to a human if unsure.”
A good prompt shapes the AI’s voice. Don’t leave it up to chance.
Forgetting to Add Memory
The agent treats every message like it’s the first. Without any memory, it will have no recall, no context, and conversations will not make any sense to the user.
Use Simple Memory for short-term recall, or connect a vector database like Pinecone or Weaviate for deeper memory. Even tracking just 5 previous messages gives your agent enough context to hold a basic conversation.
Cramming Too Much into One Workflow
When you cram too much into one workflow, your canvas will turn into a tangle of nodes. It’s hard to track what does what which will make it even harder to fix bugs.
Break it up. Use sub-workflows for specific tasks:
- One for handling messages
- One for logging
- One for fallback routes
Not Testing for Real-World Inputs
Everything works fine in your tests, but if a user types “🤔 how do I reset?”, the bot will just stare blankly.
Simulate all sorts of messages, typos, slang, emojis, vague phrases, and long-winded questions. Use If nodes to detect confusion or silence, then route unclear inputs to a human or ask follow-up questions.
Ignoring API Limits and Token Costs
Your OpenAI bill can skyrocket real quick if you dont account for API limits and costs. Your chatbot will also stop working because it hit the rate limit.
- Cache common replies (use Switch nodes).
- Log token usage per call.
- Set up alerts for failures or high usage.
- Fall back to saved answers or even a “We’re having trouble” message when the API times out.
Avoiding these pitfalls early will save you hours of frustration later. It’ll also make your agent way more reliable when you scale and that’s where the real magic happens.
Conclusion
The beauty of using n8n for AI automation is that you don’t need to code your way into intelligent systems. With just a few nodes, some thoughtful prompting, and the right integrations, you can build AI agents that do meaningful work from managing conversations to powering internal tools.
If you’re interested in taking this further, especially in applying these concepts to domains like marketing, operations, or enterprise workflows, there’s real value in learning from practitioners who’ve done this at scale.
Join Interview Kickstart’s free Build AI Agents & Automate Workflows with n8n Masterclass. With this masterclass, you will understand how memory and decision layers work in larger workflows and learn directly from someone who’s led AI efforts at Meta and Twitter. It’s a good next step if you’re serious about automating smarter.